ShopDreamUp AI ArtDreamUp
Deviation Actions


Suggested Deviants


Suggested Collections


![[ACTION] 3D EFFECT](https://images-wixmp-ed30a86b8c4ca887773594c2.wixmp.com/i/17725f18-5736-4c56-8a6b-928a13882d19/d8h2ddz-20bafd15-dd36-48dc-a855-82d9ad401def.png/v1/crop/w_184,h_184,x_43,y_0,scl_0.39740820734341,q_70,strp/_action__3d_effect_by_fizhamsel_d8h2ddz-92s-2x.jpg)
![[ACTION] 3D EFFECT](https://images-wixmp-ed30a86b8c4ca887773594c2.wixmp.com/i/17725f18-5736-4c56-8a6b-928a13882d19/d8h2ddz-20bafd15-dd36-48dc-a855-82d9ad401def.png/v1/crop/w_92,h_92,x_22,y_0,scl_0.19870410367171,q_70,strp/_action__3d_effect_by_fizhamsel_d8h2ddz-92s.jpg)


You Might Like…


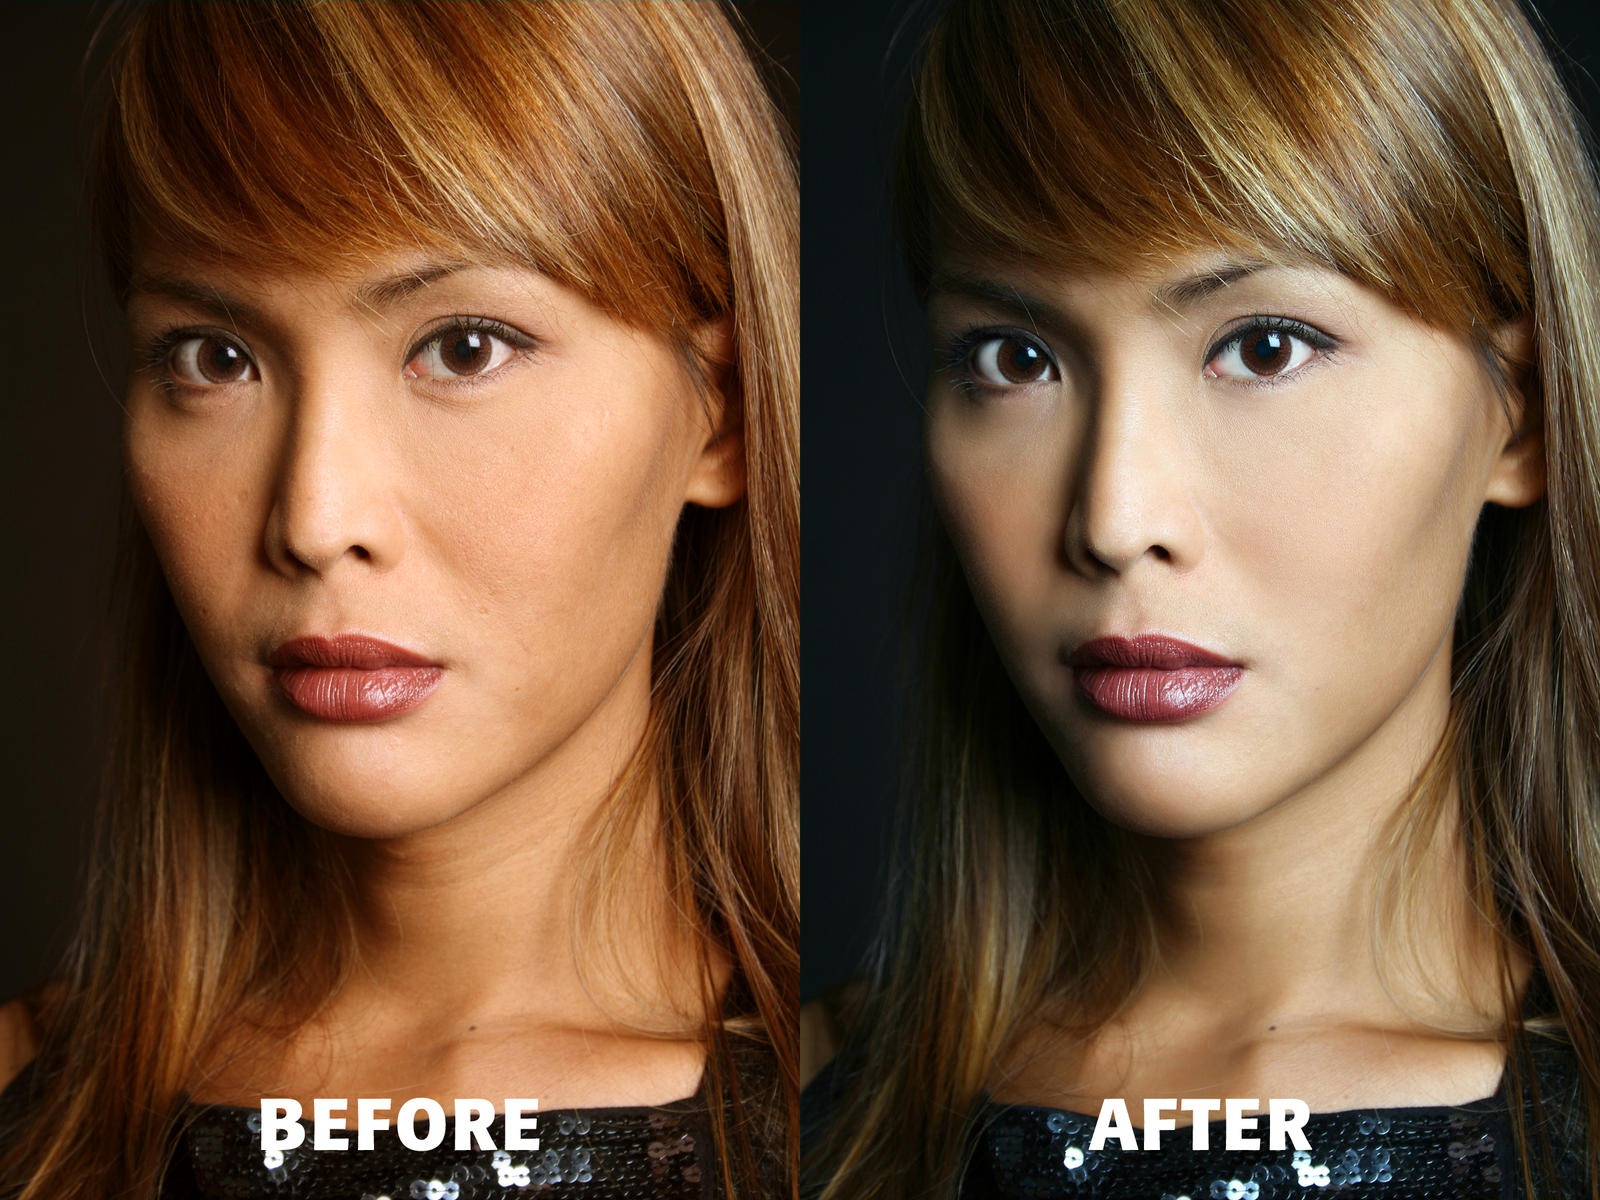
Description
I was asked over on Flickr numerous times how I go about retouching an image, now for MOST of you, this will be the long way, it is even for me sometimes, but it's the perfectionists way.
1. Create a new layer and crop the image, blending any background you need to.
2. Analyze the image, check it's levels and adjust accordingly. Then adjust the curves and color, DO NOT use the auto color or auto tone features unless you plan on going back in the history palette, as I find these usually end up very wrong. If image lacks a good range of darks and lights, create a duplicate layer and make the blending mode of that layer "Multiply" and adjust the transparency of the layer till the image looks right.
3. Use the healing brush to cover up any blemishes. Choose/sample a similar piece of skin and skin tone, do not use a blurry section of skin to heal one with visible pores! Go slow and use sparingly to make sure skin tones, textures, etc match.
4. Once you are done with healing brush, duplicate layer and turn upper layer off, now work on the lower layer.
5. Adjust warmth of lower layer (I usually add 30-40% with adjust/photo filter/warmth, choose the warmth filter that suites the skin tone best). Now adjust the contrast, I usually pump this up to +3 - +8. Now if you have CS4, you can pump up the vibrancy up to +20 to add more kick, or lower it for an image you plan on de-saturating. Next adjust hue/saturation, this I usually add +4 - +10 depending on the image, although with this model and her deep tan I am usually de-saturating the image between -10 - -20.
6. Now adjust the transparency and blending mode of the top layer (usually normal and 60% or soft light and 50%, your image WILL vary).
7. Once the image looks right to you, flatten the image. Now comes final retouching.
8. I usually go to the eye area 1st and remove any blood vessels/veins with a combination of healing brush (set very small and soft) and/or clone tool (again, very small and soft with transparency set to about 10-15%). Next for eyes I use the dodge tool (small soft round brush) set to 7-10% to lighten up eyes but still leaving tone to show they are round. Then it's the burn tool (again, soft round brush at 10-20% and exposure set to between 3-7%), use this to go over pupil, iris, and edges of eye, as well as upper and lower lashes.
9. Once that is done, I check the eyelashes and eyebrows to make sure they are even and have no bare spots or blemishes. If you encounter bare spots or blemishes, sample the color of the eyebrow/lash and use a soft round brush at about 20% transparency and on a NEW layer stroke in lashes/brows till satisfied. Once happy, flatten image again (unless you love storing large psd files).
10. Check the hair and do the same, you can sample like flowing parts of the actual hair to make things easier, but leave cloning brush between 20-30% transparency. You can also add a layer and stroke in hair as descried above as well as add another layer set to color to add in highlights. If hair appears dull and lifeless you can sample the color of the hair with the eyedropper brush and then go to color palette and make slightly more bolder/vibrant and then choose large round soft brush set to saturation and transparency of around 15% and brush over hair parts you want to intensify.
11. Duplicate layer, the new layer will now be your work layer.
12. Now is time for dodging and burning, set tools at a decent size (large) and soft with a transparency between 3 - 20% and dodge your highlights or add highlights, and burn your shadows if need be until the effect you want to achieve has been reached.
13. Remember to work zoomed in 100-200% and zoom out to check your work!
14. Set PS history states preferences to between 50-100, this will save you heartache!
15. Once you are generally happy with your image, flatten it and again, adjust colors/contrast/saturation until you get exactly what you want, if not there already.
16. Oops almost forgot, to finish, if need be, use the unsharp mask filter under sharpening, no other sharpening filters, set to 50% and 1 pixel should do the trick to just give it that bit of extra clarity.
Other Tricks:
You shot the image on a white background but now want a black background. Generally there is no need for masking, just paint in black background, going around edge of subject with small soft brush and large harder brush for open areas, burn and blend subject into background, one way to do that is with the next trick... Spotlighting...
Create a duplicate layer and adjust brightness/contrast (set brightness to very dark and contrast to very little, do again after oking 1st time if not dark enough, but be sure to leave detail in your blacks), if you want you can also go to adjust/phot filters/cool or blue and add some darker blue tones to your shadows and overall effect. Now with a large soft brush eraser with a transparency of 10-20% go over areas you want to emerge from the darkness, adjust eraser brush size to highlight smaller areas. Once effect you want is achieved, flatten image. (You may need to burn in edges of hair before flattening to have them fade/disappear into the darkness.)
Well I hope this helps and answers some/most of your questions. there are things I do do besides this to achieve MY look, so do feel free to experiment. As for PS plugins. I do not like most as they make things very un-natural, there are only 3 I do recommend, they are (Alien Skin - Bokeh (great for DOF and tilt/shift lens effects), Tiffen-DFX V2 (this is great for adjusting lighting and adding in lighting affects) and Imagenomic - Portraiture (for cheating of retouching if you have no time, still doesn't mean you just hit the filter and go, but it will do a lot of these steps for you, but plugin is very touchy and needs to be used sparingly and preferably on a duplicate layer as sometimes results are harsh).
Thinking of giving away all my secrets, which will be quite a lot of pages depending on the situation and will also go into high end retouching and montaging, but that will be a pdf for sale on ebay maybe by xmas (Smile)")
Hope this was helpful to some people, know it seems long and tedious, but I actually can get through it now in around 10-20min per image. Remember, the trick is to make everything look absolutely natural. this method will leave pores on skin (unlike hi-fashion retouching which in most cases doesn't). Please no bitching, I do this out of the goodness of my heart, and it definitely is not even near 100% of my tips, tricks or knowledge.
Also, instead of all the layers, you can use adjustment layers as well. There is no right or wrong way, just the way that feels most comfortable
Thanks again for all your love and support, appreciate it
On a sobering note, I'm sure my situation isn't different from a lot of yours, but over the weekend I became a 1 income family and my pay alone won't cover everything, so If you are able to, please visit my journal and click the red bubble link as the only thing I have of value to sell is my work. If there is a certain subject you'd like to buy, landscape, still life, anything, message me here and I'll do my best to accomodate, desperate times call for desperate measure, ANY HELP APPRECIATED, thanks and god bless.
1. Create a new layer and crop the image, blending any background you need to.
2. Analyze the image, check it's levels and adjust accordingly. Then adjust the curves and color, DO NOT use the auto color or auto tone features unless you plan on going back in the history palette, as I find these usually end up very wrong. If image lacks a good range of darks and lights, create a duplicate layer and make the blending mode of that layer "Multiply" and adjust the transparency of the layer till the image looks right.
3. Use the healing brush to cover up any blemishes. Choose/sample a similar piece of skin and skin tone, do not use a blurry section of skin to heal one with visible pores! Go slow and use sparingly to make sure skin tones, textures, etc match.
4. Once you are done with healing brush, duplicate layer and turn upper layer off, now work on the lower layer.
5. Adjust warmth of lower layer (I usually add 30-40% with adjust/photo filter/warmth, choose the warmth filter that suites the skin tone best). Now adjust the contrast, I usually pump this up to +3 - +8. Now if you have CS4, you can pump up the vibrancy up to +20 to add more kick, or lower it for an image you plan on de-saturating. Next adjust hue/saturation, this I usually add +4 - +10 depending on the image, although with this model and her deep tan I am usually de-saturating the image between -10 - -20.
6. Now adjust the transparency and blending mode of the top layer (usually normal and 60% or soft light and 50%, your image WILL vary).
7. Once the image looks right to you, flatten the image. Now comes final retouching.
8. I usually go to the eye area 1st and remove any blood vessels/veins with a combination of healing brush (set very small and soft) and/or clone tool (again, very small and soft with transparency set to about 10-15%). Next for eyes I use the dodge tool (small soft round brush) set to 7-10% to lighten up eyes but still leaving tone to show they are round. Then it's the burn tool (again, soft round brush at 10-20% and exposure set to between 3-7%), use this to go over pupil, iris, and edges of eye, as well as upper and lower lashes.
9. Once that is done, I check the eyelashes and eyebrows to make sure they are even and have no bare spots or blemishes. If you encounter bare spots or blemishes, sample the color of the eyebrow/lash and use a soft round brush at about 20% transparency and on a NEW layer stroke in lashes/brows till satisfied. Once happy, flatten image again (unless you love storing large psd files).
10. Check the hair and do the same, you can sample like flowing parts of the actual hair to make things easier, but leave cloning brush between 20-30% transparency. You can also add a layer and stroke in hair as descried above as well as add another layer set to color to add in highlights. If hair appears dull and lifeless you can sample the color of the hair with the eyedropper brush and then go to color palette and make slightly more bolder/vibrant and then choose large round soft brush set to saturation and transparency of around 15% and brush over hair parts you want to intensify.
11. Duplicate layer, the new layer will now be your work layer.
12. Now is time for dodging and burning, set tools at a decent size (large) and soft with a transparency between 3 - 20% and dodge your highlights or add highlights, and burn your shadows if need be until the effect you want to achieve has been reached.
13. Remember to work zoomed in 100-200% and zoom out to check your work!
14. Set PS history states preferences to between 50-100, this will save you heartache!
15. Once you are generally happy with your image, flatten it and again, adjust colors/contrast/saturation until you get exactly what you want, if not there already.
16. Oops almost forgot, to finish, if need be, use the unsharp mask filter under sharpening, no other sharpening filters, set to 50% and 1 pixel should do the trick to just give it that bit of extra clarity.
Other Tricks:
You shot the image on a white background but now want a black background. Generally there is no need for masking, just paint in black background, going around edge of subject with small soft brush and large harder brush for open areas, burn and blend subject into background, one way to do that is with the next trick... Spotlighting...
Create a duplicate layer and adjust brightness/contrast (set brightness to very dark and contrast to very little, do again after oking 1st time if not dark enough, but be sure to leave detail in your blacks), if you want you can also go to adjust/phot filters/cool or blue and add some darker blue tones to your shadows and overall effect. Now with a large soft brush eraser with a transparency of 10-20% go over areas you want to emerge from the darkness, adjust eraser brush size to highlight smaller areas. Once effect you want is achieved, flatten image. (You may need to burn in edges of hair before flattening to have them fade/disappear into the darkness.)
Well I hope this helps and answers some/most of your questions. there are things I do do besides this to achieve MY look, so do feel free to experiment. As for PS plugins. I do not like most as they make things very un-natural, there are only 3 I do recommend, they are (Alien Skin - Bokeh (great for DOF and tilt/shift lens effects), Tiffen-DFX V2 (this is great for adjusting lighting and adding in lighting affects) and Imagenomic - Portraiture (for cheating of retouching if you have no time, still doesn't mean you just hit the filter and go, but it will do a lot of these steps for you, but plugin is very touchy and needs to be used sparingly and preferably on a duplicate layer as sometimes results are harsh).
Thinking of giving away all my secrets, which will be quite a lot of pages depending on the situation and will also go into high end retouching and montaging, but that will be a pdf for sale on ebay maybe by xmas
Hope this was helpful to some people, know it seems long and tedious, but I actually can get through it now in around 10-20min per image. Remember, the trick is to make everything look absolutely natural. this method will leave pores on skin (unlike hi-fashion retouching which in most cases doesn't). Please no bitching, I do this out of the goodness of my heart, and it definitely is not even near 100% of my tips, tricks or knowledge.
Also, instead of all the layers, you can use adjustment layers as well. There is no right or wrong way, just the way that feels most comfortable
Thanks again for all your love and support, appreciate it
On a sobering note, I'm sure my situation isn't different from a lot of yours, but over the weekend I became a 1 income family and my pay alone won't cover everything, so If you are able to, please visit my journal and click the red bubble link as the only thing I have of value to sell is my work. If there is a certain subject you'd like to buy, landscape, still life, anything, message me here and I'll do my best to accomodate, desperate times call for desperate measure, ANY HELP APPRECIATED, thanks and god bless.
Image size
2400x1800px 3 MB
© 2009 - 2024 ikonvisuals
Comments24
Join the community to add your comment. Already a deviant? Log In
thanks